Hey there! So, you’re thinking about waving goodbye to your Apple TV subscription? No worries, I’ve got your back. Apple TV, with its galaxy of shows and movies, has been a cozy corner for many. But sometimes, it’s just time to part ways, right? Whether it’s to cut costs or simply because you’ve watched everything twice, knowing how to cancel your Apple TV subscription is as essential as knowing the best shows on it.
In this guide, I’ll walk you through the nitty-gritty of canceling your Apple TV subscription. It’s not just about hitting a ‘cancel’ button; there’s a bit more to it. But fear not, it’s nothing you can’t handle. Let’s dive in and untangle this together, shall we?
Canceling on iPhone and iPad
Alright, let’s tackle this on your iPhone or iPad first. It’s pretty straightforward, so you’ll be done in no time. Just follow these steps:
Open the Settings App: Tap that gear icon on your home screen. It’s your gateway to all things ‘settings’ on your device.
Tap on Your Apple ID: You’ll see your name or picture at the top. That’s your Apple ID. Give it a tap.
Subscriptions Ahoy: Scroll down a bit, and you’ll find ‘Subscriptions.’ This is where Apple TV and all your other subscriptions hang out.
Find Apple TV: In the list of subscriptions, Apple TV should be waving at you. Tap on it.
The Big Red Button: Here’s where the magic happens. You’ll see an option to cancel the subscription. Go ahead and tap it.
Confirm Your Decision: A pop-up might ask if you’re sure. If your mind’s made up, confirm it.
Voilà! You’ve just canceled your Apple TV subscription on your iPhone or iPad. Easy as pie, right?
Canceling on a Mac

Now, for the Mac users out there, let’s get down to business. Canceling your Apple TV subscription on a Mac can vary slightly depending on your macOS version. But don’t sweat it; I’ll guide you through.
For macOS Mojave or Earlier:
Open iTunes: Remember iTunes? Open it up. It’s where the magic happens for older macOS versions.
Account in the Menu Bar: Look at the top, and you’ll see ‘Account.’ Click it.
View My Account: You might need to sign in with your Apple ID here. Go ahead, it’s safe.
Scroll to Subscriptions: In the ‘Account Information’ page, scroll down to ‘Settings,’ and find ‘Subscriptions.’ Click on ‘Manage.’
Spot Apple TV: You’ll see your Apple TV subscription here. Click ‘Edit’ next to it.
Cancel It: Here’s the ‘Cancel Subscription’ button. Give it a click and confirm.
For macOS Catalina or Later:
Open System Preferences: Click on the Apple menu and select ‘System Preferences.’
Apple ID, Please: Click on your Apple ID. It’s usually right there at the top.
Media & Purchases: On the sidebar, find ‘Media & Purchases’ and click it.
Manage Subscriptions: Look for ‘Manage’ next to ‘Subscriptions.’ That’s your target.
Find Apple TV: In the list of subscriptions, locate Apple TV.
Cancel and Confirm: Click on ‘Edit’ next to Apple TV, then find and click ‘Cancel Subscription.’ Confirm your choice.
And there you have it, Mac users! Whether you’re rocking an older or newer macOS, canceling your Apple TV subscription is just a few clicks away.
Canceling on Apple TV

Got an Apple TV device? No problem! Canceling your subscription directly from your Apple TV is like navigating a spaceship, but way easier. Here’s how you do it:
Head to Settings: Grab your Apple TV remote and scoot over to the ‘Settings’ icon. It’s your command center.
Click on Users & Accounts: You’ll find this option in the Settings menu. It’s where all the user profiles hang out.
Select Your Account: Choose the account you used to subscribe to Apple TV. It’s usually your main Apple ID.
Subscriptions, Here We Come: Scroll down to ‘Subscriptions.’ This is where your Apple TV subscription is chilling.
Find and Cancel: Select your Apple TV subscription, and there it is – the ‘Cancel Subscription’ option. Give it a click.
Confirm Your Choice: A prompt will ask if you’re sure about canceling. If you’re all set, confirm it.
Sometimes, you might hit a snag, like the option not appearing. If that happens, don’t panic. Just check if you’re logged in with the correct Apple ID or try canceling through another device.
Canceling Without an Apple Device
Not using an Apple device? No sweat! You can still cancel your Apple TV subscription. Here’s your game plan:
Open a Web Browser: Any web browser will do – Chrome, Firefox, Safari, you name it.
Visit Apple’s Website: Head over to appleid.apple.com and log in with your Apple ID.
Account Settings: Once logged in, navigate to the ‘Account’ section.
Subscriptions Tab: Look for the ‘Subscriptions’ section. This is where your Apple TV subscription lives.
Cancel Subscription: Find your Apple TV subscription and click on ‘Edit.’ Here, you’ll see the option to cancel. Click on it.
Confirm Your Decision: A prompt will ask for confirmation. If you’re sure, go ahead and confirm.
And just like that, you’ve canceled your Apple TV subscription, even without an Apple device. Pretty handy, right?
Managing Subscriptions through the Apple TV App

Navigating the Apple TV app to manage your subscriptions is like being the captain of your own ship. You’re in control, and it’s surprisingly simple. Here’s how you can steer the course:
Open the Apple TV App: This app is your one-stop-shop for all things Apple TV. Find it on your device and open it up.
Head to Account Settings: Look for the account icon, usually at the bottom or in the upper right corner. Tap it to access your account settings.
Subscriptions, Ahoy! In the account settings, you’ll find ‘Subscriptions.’ This is where all your active subscriptions, including Apple TV, are listed.
Manage Your Apple TV Subscription: Find your Apple TV subscription and tap on it. Here, you’ll see the details and the option to manage it.
Cancel If You Wish: If you’re looking to cancel, just tap on ‘Cancel Subscription.’ It’s straightforward and right to the point.
Confirm Your Decision: A prompt will pop up, asking if you’re sure about canceling. If you’re ready, confirm it.
Visual guides in the app can be super helpful. They’re like little breadcrumbs leading you to where you need to go. Keep an eye out for them!
Common Questions and Concerns
When it comes to canceling your Apple TV subscription, you might have a few questions or concerns. Let’s address some of the common ones:
Will I Lose Access Immediately? Nope, you’ll still have access until the end of your current billing cycle. It’s like a farewell tour!
What About My Shows? Any shows or movies you’ve downloaded will stick around until your subscription ends. So, binge-watch while you can!
Can I Resubscribe? Absolutely! If you ever miss Apple TV, coming back is as easy as subscribing again.
What Happens After You Cancel?
So, you’ve hit the cancel button. What now? Here’s the lowdown:
Access Until the End of Billing Cycle: You can still watch all your favorite shows until your current billing period is over. It’s like the last hurrah!
No More Charges: Once canceled, you won’t be billed for the next cycle. It’s a little extra cash in your pocket.
Downloaded Content: Remember, any downloaded content will be available until the end of the billing cycle. After that, it’s sayonara.
Alternatives to Apple TV

Thinking of jumping ship to another streaming service? Here are some alternatives:
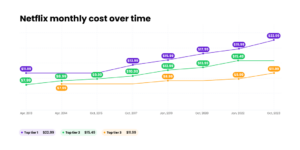
Netflix: The big kahuna of streaming services, with a vast library of shows and movies.
Amazon Prime Video: A great choice if you’re already an Amazon Prime member.
Hulu: Perfect for those who want current TV shows alongside a solid movie selection.
Disney+: A must-have for Disney, Marvel, and Star Wars fans.
Each service has its unique features, so consider what you love watching before making a switch.
Tips for Managing Digital Subscriptions
Keeping track of digital subscriptions can be a juggling act. Here are some tips to help:
Use Subscription Management Apps: Apps like Truebill or Mint can help you keep an eye on all your subscriptions.
Set Calendar Reminders: Mark renewal dates on your calendar. It’s a simple way to avoid surprises.
Regularly Review Your Subscriptions: Every few months, take a look at what you’re subscribed to and decide if it’s still worth it.
Conclusion
And there you have it, a complete guide on how to cancel your Apple TV subscription. From iPhones to non-Apple devices, we’ve covered it all. Remember, managing your subscriptions is all about staying informed and making choices that suit your needs. Whether you’re taking a break or moving on to new streaming adventures, you’re now equipped with all the know-how you need. Happy streaming (or unstreaming)!