We’ve all been there. The allure of Apple Music, the convenience of the App Store, and the seamless integration of Apple services across our devices make subscribing almost second nature. But what happens when you want to cancel a subscription? Fear not! This guide is here to help.
The ease of subscribing to Apple services.
Apple has made it incredibly easy to subscribe to its vast array of services. From Apple Music to the App Store, with just a few clicks, you’re in. But as with all good things, sometimes we need to take a step back.
The need to cancel subscriptions and its challenges.
There could be numerous reasons why one would want to cancel a subscription. Maybe you’re not using Apple Music as much, or perhaps you’ve found an alternative app in the App Store. Whatever the reason, canceling subscriptions can sometimes be a tad more challenging than starting them. But don’t worry, we’ve got you covered.
Understanding Apple Subscriptions
A brief overview of Apple’s subscription services.
Apple offers a plethora of subscription services. The most popular, of course, is Apple Music. But there’s also the App Store, where you can subscribe to various apps and services. These subscriptions are tied to your Apple ID, making it easy to access them across all your Apple devices.
The integration of Apple services across devices.
One of the beauties of Apple’s ecosystem is how seamlessly everything integrates. Your Apple Music subscription on your iPhone or iPad is the same one you use on your Mac. This integration, while fantastic, can sometimes make it tricky to figure out how to cancel subscriptions. But don’t fret; we’re diving deep into that next.
How to Cancel Subscription on iPhone and iPad
Navigating to the Settings app.
Unlock your iPhone or iPad.
Find the “Settings” app on your home screen and tap to open it.
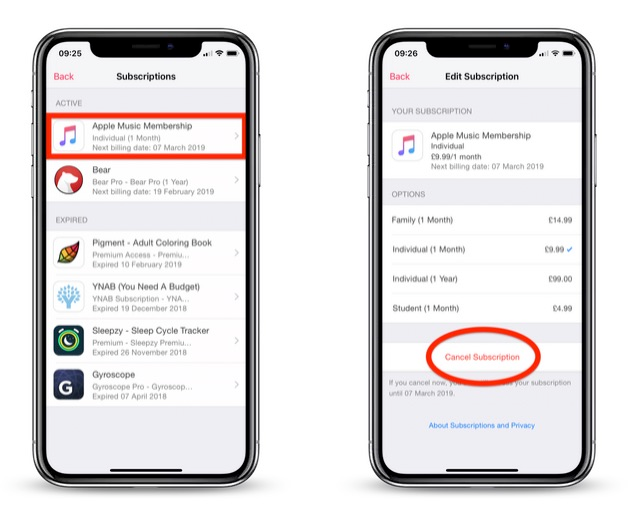
Tap on your name and select ‘Subscriptions’.
At the top of the Settings section, tap on your Apple ID profile.
Scroll down and tap “Subscriptions.”
Choose the desired subscription and tap ‘Cancel Subscription’.
You’ll see a list of all your active and expired subscriptions.
Tap the subscription you want to cancel.
Scroll down and tap the “Cancel Subscription” button.
Confirm your decision, and voila! Your subscription is canceled.
Canceling Subscriptions on Mac
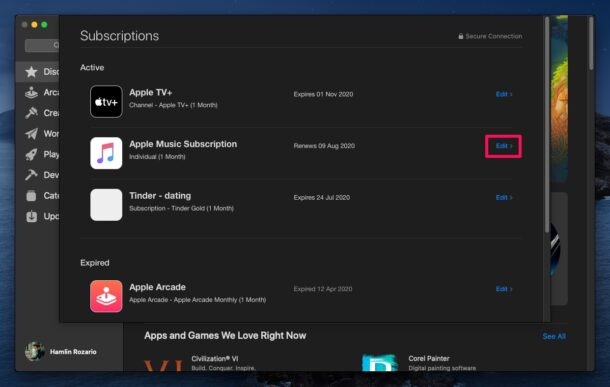
Opening the App Store app.
Click on the App Store icon in your dock.
In the App Store, click on the profile icon in the bottom left corner.
Accessing ‘Account Settings’.
A menu will pop up. Click “View My Account.”
Scroll down to the “Settings” section.
Managing subscriptions and selecting ‘Cancel Subscription’.
Next to “Subscriptions,” click “Manage.”
Find the subscription you want to cancel and click “Edit.”
Click the “Cancel Subscription” button and confirm.
Using the Apple Music Website for Cancelation
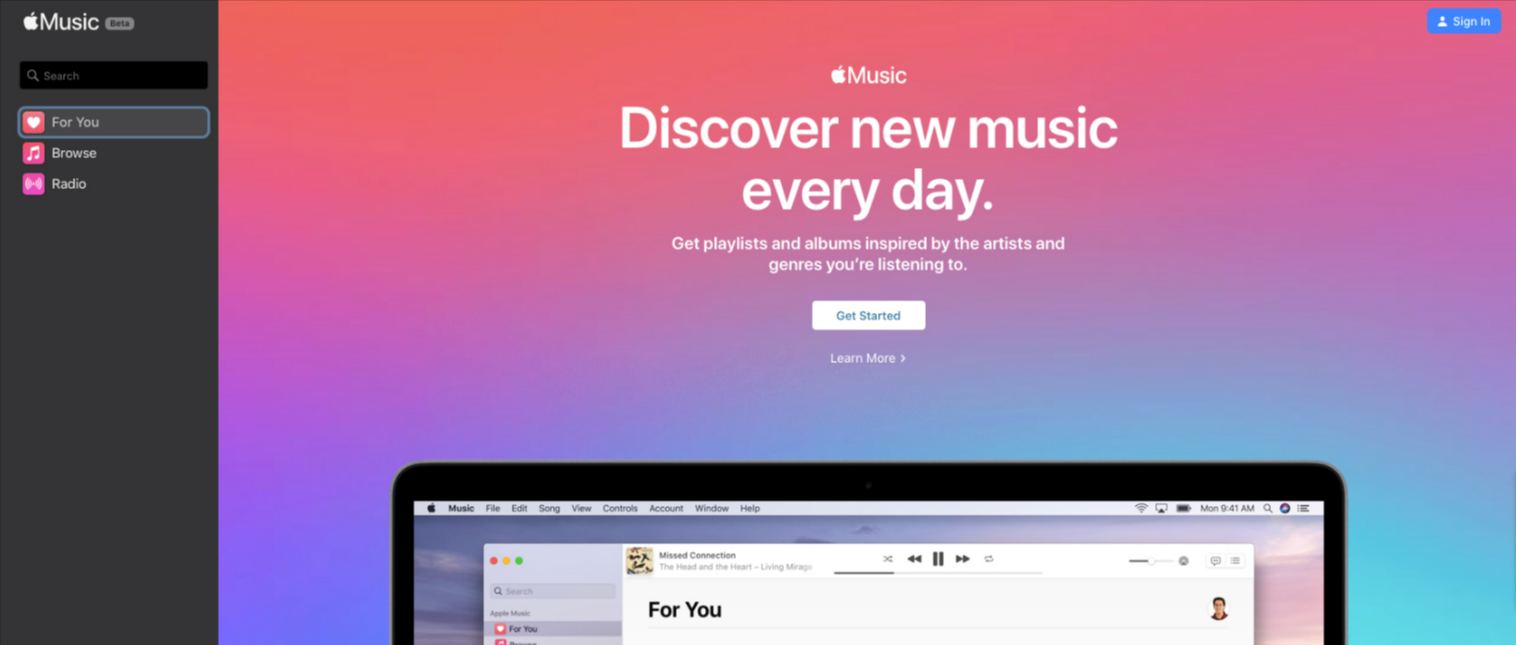
Logging into the Apple Music website.
Open your preferred browser and navigate to the Apple Music website.
Click on the profile icon located in the upper right corner.
Enter your Apple ID and password to log in.
Navigating to ‘Account Settings’ and managing subscriptions
Once logged in, hover over your profile icon and click on ‘Account Settings’.
Scroll down to the ‘Subscriptions’ section and click ‘Manage’.
Opting to cancel the subscription.
You’ll see a list of all your active subscriptions. Find Apple Music and click ‘Edit’.
Click the ‘Cancel Subscription’ button.
A prompt will appear, asking if, you’re sure. Confirm your decision, and you’re all set!
Canceling Apple Music on Android Devices
Yes, Apple Music isn’t just for Apple devices! If you’re jamming out on an Android device but want to cancel your subscription, here’s how.
Opening the Apple Music app.
Unlock your Android device and open the Apple Music app.
Accessing ‘Account’ and managing subscriptions.
Tap on the profile icon located in the upper right corner.
From the dropdown menu, select ‘Account’.
Scroll down and tap ‘Manage Subscriptions’.
Opting to cancel a subscription.
Find Apple Music from the list and tap on it.
Tap the ‘Cancel Subscription’ option and confirm your decision.
Special Considerations
Before you rush to cancel, there are a few things you should know.
Understanding the terms of Cancelation.
Canceling your subscription will end at the end of the current billing cycle. This means you can still enjoy Apple Music until then. Any discounted trial subscription will end immediately upon cancelation
What happens post-cancelation: Access to the music library, playlists, and other features.
After canceling, you”ll lose access to your Apple Music library and any playlists you’ve created. However, any music you’ve purchased will remain in your library.
The difference between canceling and pausing a subscription.
While Apple doesn’t offer a way to pause your subscription, you can cancel and then resubscribe whenever you’re ready. Just remember, if you had a special pricing or trial, you might not get it back.
Alternatives to Apple Music
If Apple Music isn’t your jam, there are other fish in the sea.
Exploring other music streaming platforms.
Spotify: A popular alternative with a vast music library and personalized playlists.
Tidal: Known for its high-fidelity sound quality.
Amazon Music: Offers a vast library and comes bundled with Amazon Prime.
The advantages of Platforms like Spotify:
Spotify for instance, offers a free tier, personalized playlists like ” Discover Weekly”, and collaborative playlist features.
Conclusion
The importance of managing subscriptions.
In today’s digital age, it’s easy to get caught up in a whirlwind of subscriptions. it’s crucial to regularly review and ensure you’re only subscribed to services you use and love.